Create Invalidation to Refresh Cache Content
Objective: Create an Invalidation for the CloudFront Distribution
StudentWebsiteDistribution(section 7.1) to refresh the cache content, ensuring the static files (index.html,styles.css,scripts.js, section 6.2) from the S3 Bucketstudent-management-website-2025are updated on the CloudFront domain (e.g., https://d12345678.cloudfront.net). This ensures that users see the latest version of the web interface when files are modified, while maintaining integration with thestudentAPI (stageprod, section 4.8) to perform functions such as saving, viewing, and backing up data. After creating the invalidation, check the Deploying status and the interface via the Distribution domain name.
Overview of Invalidation
- Role of Invalidation:
- CloudFront caches content at edge locations to speed up loading times, but when files in S3 (
index.html,styles.css,scripts.js) are updated, old cache can cause users to see outdated versions. - Invalidation instructs CloudFront to delete the cache and fetch the latest version from S3, ensuring the web interface reflects changes.
- Use the
/*path to invalidate all cache content in the distribution, suitable when updating multiple files or when the specific file changed is not known (e.g., after uploading a new version ofstyles.cssorscripts.jsfrom section 6.2).
- CloudFront caches content at edge locations to speed up loading times, but when files in S3 (
- Integration with the system:
- CloudFront serves static files (
index.html,styles.css,scripts.js, section 6.2) from the S3 Bucketstudent-management-website-2025(sections 6.1–6.4) through Origin Access Identity (OAI) (section 7.1) to restrict access. - The web interface calls the
studentAPI (section 4.8) with the Invoke URL (e.g., https://abc123.execute-api.us-east-1.amazonaws.com/prod) andStudentApiKey(section 4.2). - The functions include:
- POST /students: Save records to DynamoDB
studentDataand send a confirmation email via SES. - GET /students: Display data in the table.
- POST /backup: Create a file in the S3 Bucket
student-backup-20250706(section 6.5) and send notification emails via SES.
- POST /students: Save records to DynamoDB
- CORS is configured (section 4.7) to support requests from the CloudFront domain (e.g., https://d12345678.cloudfront.net).
- CloudFront serves static files (
Initial Requirements
You need to complete section 7.1 (create the CloudFront Distribution StudentWebsiteDistribution), section 7.2 (configure the Default Root Object), section 6.1 (create the student-management-website-2025 bucket), section 6.2 (upload index.html, styles.css, scripts.js), section 6.3 (enable Static Website Hosting), section 6.4 (configure Bucket Policy), section 6.5 (configure the student-backup-20250706 bucket), section 5 (build the web interface), section 4.1 (create the student API), section 4.2 (create the StudentApiKey), section 4.3 (create the StudentUsagePlan), section 4.4 (create the GET /students method), section 4.5 (create the POST /students method), section 4.6 (create the /backup resource and POST /backup method), section 4.7 (enable CORS), section 4.8 (deploy the API to the prod stage), section 4.9 (link the StudentApiKey to StudentUsagePlan). Ensure your AWS account has cloudfront:CreateInvalidation, s3:GetObject, and the AWS region is us-east-1 for related services.
Detailed Actions
-
Access the AWS Management Console
- Log in to the AWS Management Console with your AWS account.
- In the search bar, type CloudFront and select the Amazon CloudFront service.
- Check the AWS region: CloudFront is a global service, but ensure the S3 Bucket
student-management-website-2025,studentAPI, Lambda, DynamoDB, and SES are inus-east-1.
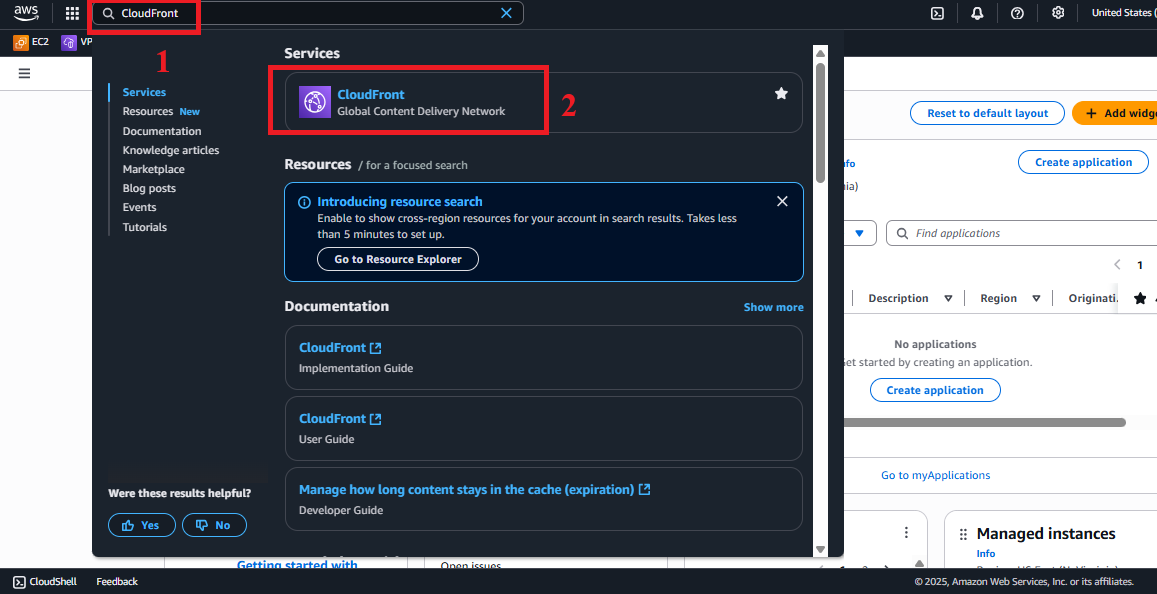
Figure 1: AWS Console Interface with the CloudFront search bar.
-
Select the CloudFront Distribution
- In CloudFront > Distributions, find and select the distribution named
StudentWebsiteDistribution(created in section 7.1).- Identification: The distribution has an ID starting with
E...and the Domain name is of the formd12345678.cloudfront.net.
- Identification: The distribution has an ID starting with
- Click the ID or distribution name to enter the distribution details interface.
- Check the status: Ensure the distribution is Enabled. If it is still In Progress, wait 5–15 minutes for the deployment to complete (section 7.1).
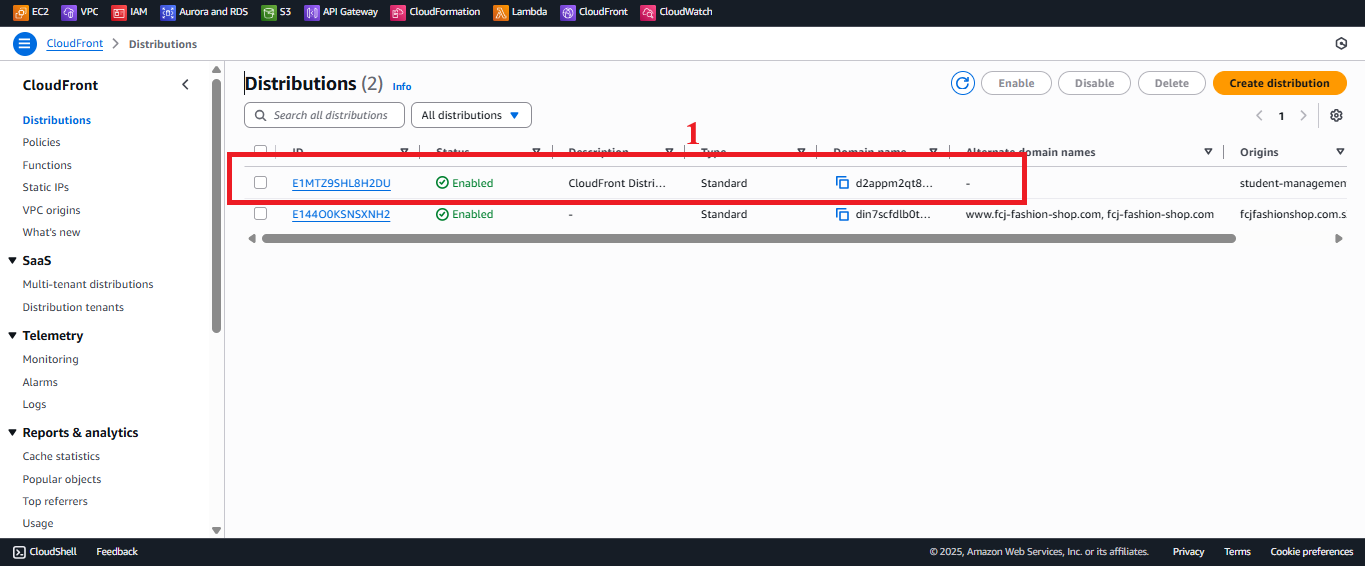
Figure 2: Select CloudFront Distribution.
- In CloudFront > Distributions, find and select the distribution named
-
Access the Invalidations Tab
- In the details interface of
StudentWebsiteDistribution, select the Invalidations tab (usually at the top of the page, next to General, Behaviors, etc.). - The Invalidations tab shows a list of invalidations created (if any), with columns such as ID, Status (In Progress or Completed), and Last modified.
- In the details interface of
-
Create Invalidation
- In the Invalidations tab, click the Create invalidation button.
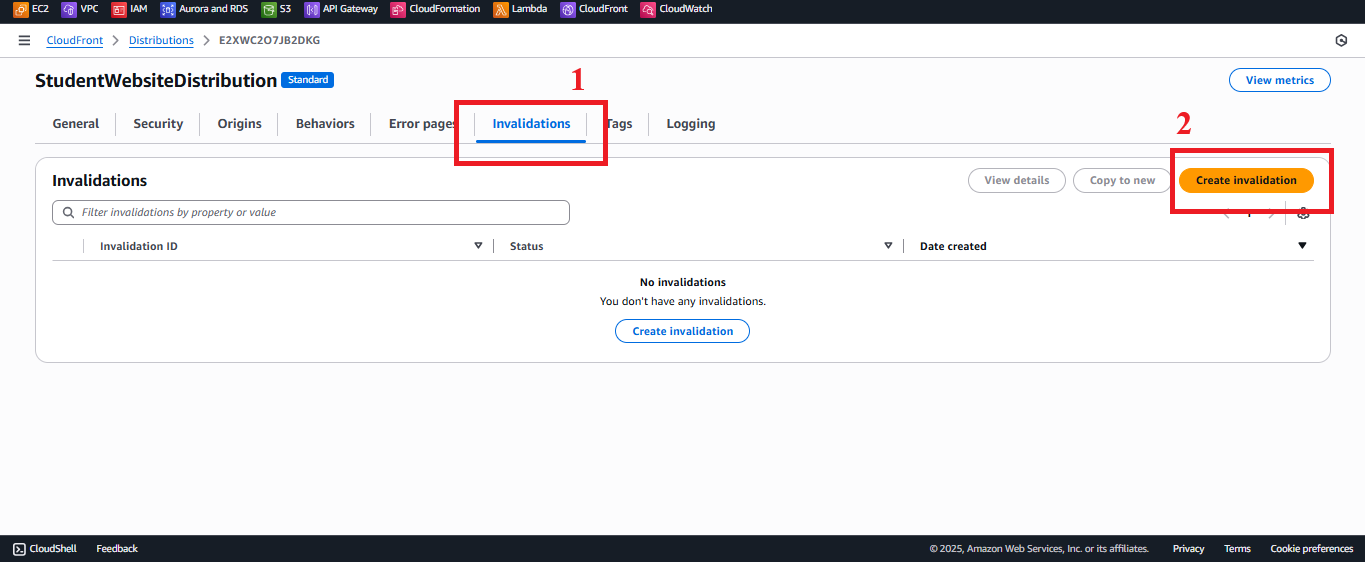
Figure 3: Create Invalidation Button in the Invalidations Tab. - In the Create invalidation interface, in the Add object paths field, enter
/*.- Reason:
- The
/*path instructs CloudFront to invalidate all cache content in the distribution, ensuring all files (index.html,styles.css,scripts.js) are fetched as the latest version from S3. - This is suitable when updating multiple files or when the specific changed file is not known (e.g., after uploading a new version of
styles.cssorscripts.jsfrom section 6.2).
- The
- Optional: If only updating one file, enter the specific path (e.g.,
/index.html,/styles.css) to reduce invalidation costs.
- Reason:
- Click Create invalidation.
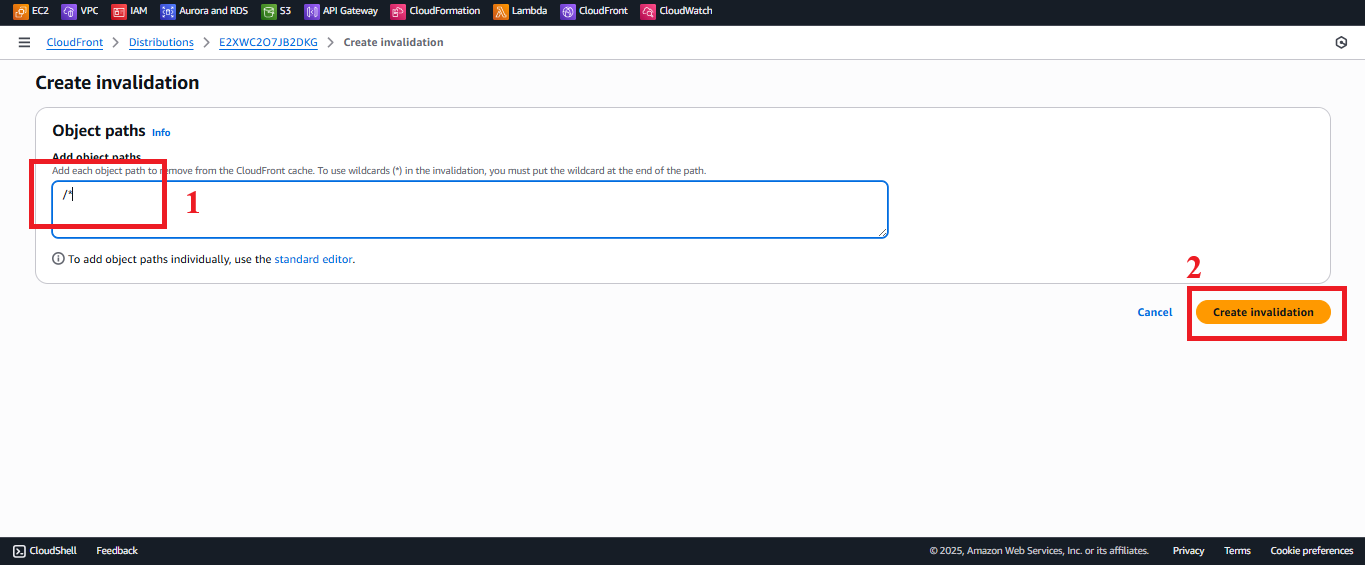
Figure 4: Configure/*Path for Invalidation. - Expected result: CloudFront creates a new invalidation, showing in the Invalidations tab with the status In Progress and the message “Successfully created invalidation”.
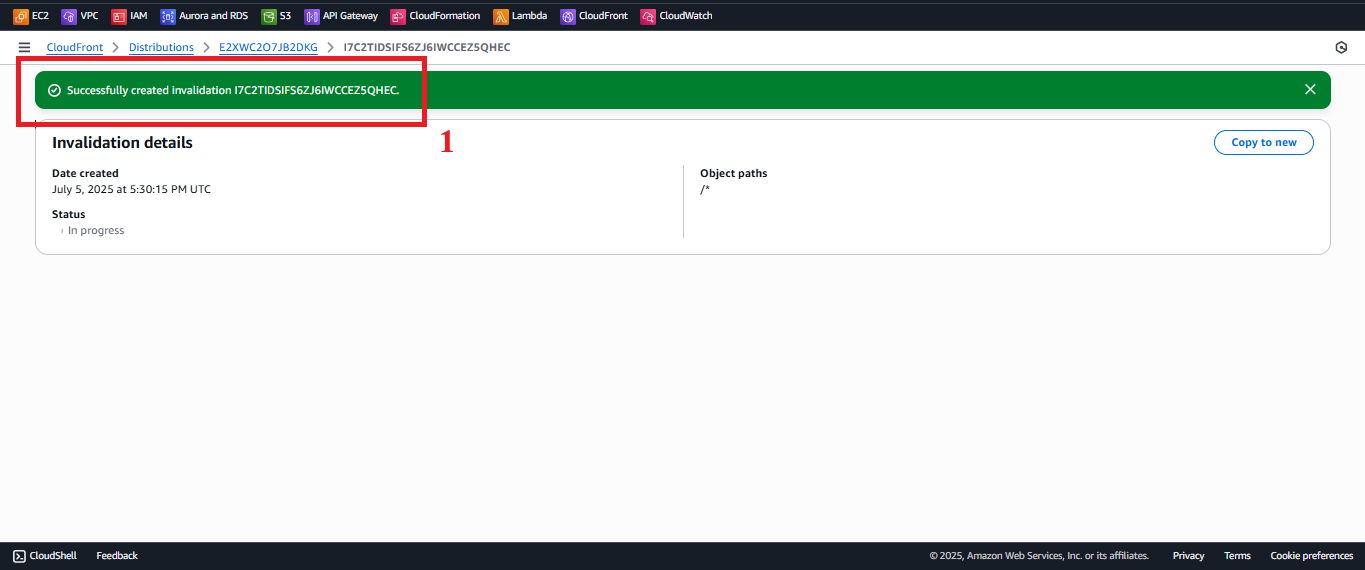
Figure 5: Successful Invalidation Creation Message.
- In the Invalidations tab, click the Create invalidation button.
-
Check Invalidation Status
- In the Invalidations tab, check the Last modified column for the recently created invalidation.
- Initial status: In Progress (CloudFront is clearing cache at edge locations, takes 1–5 minutes).
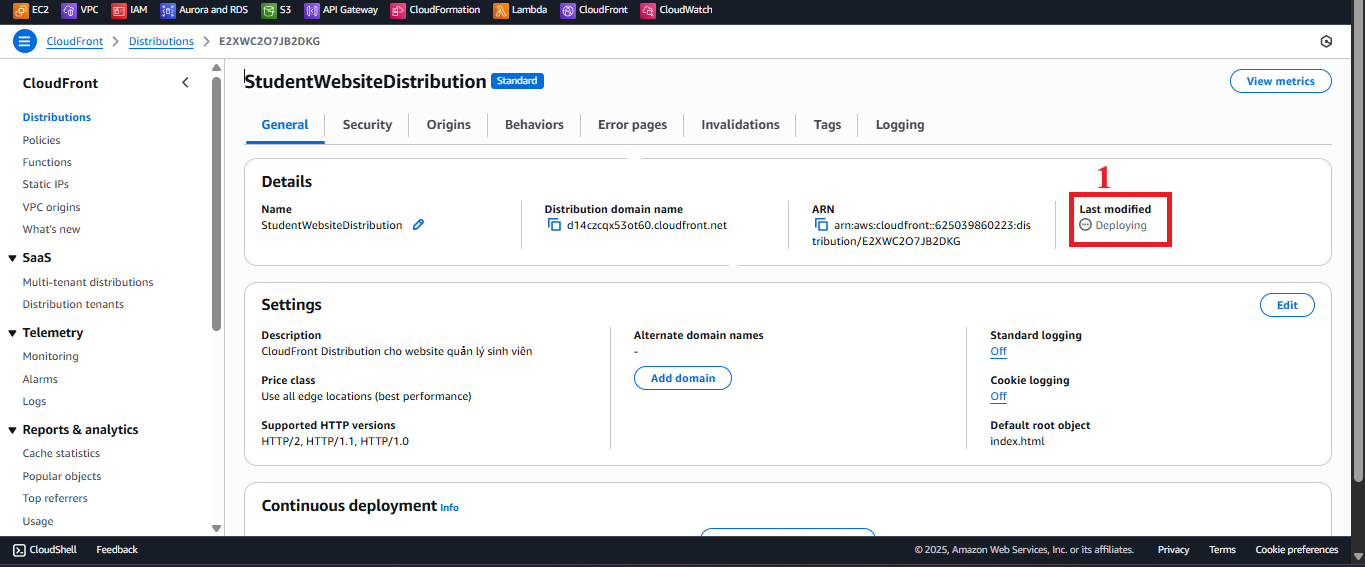
Figure 6: In Progress Invalidation Status. - Final status: Completed (the cache has been cleared, and the new content is ready).
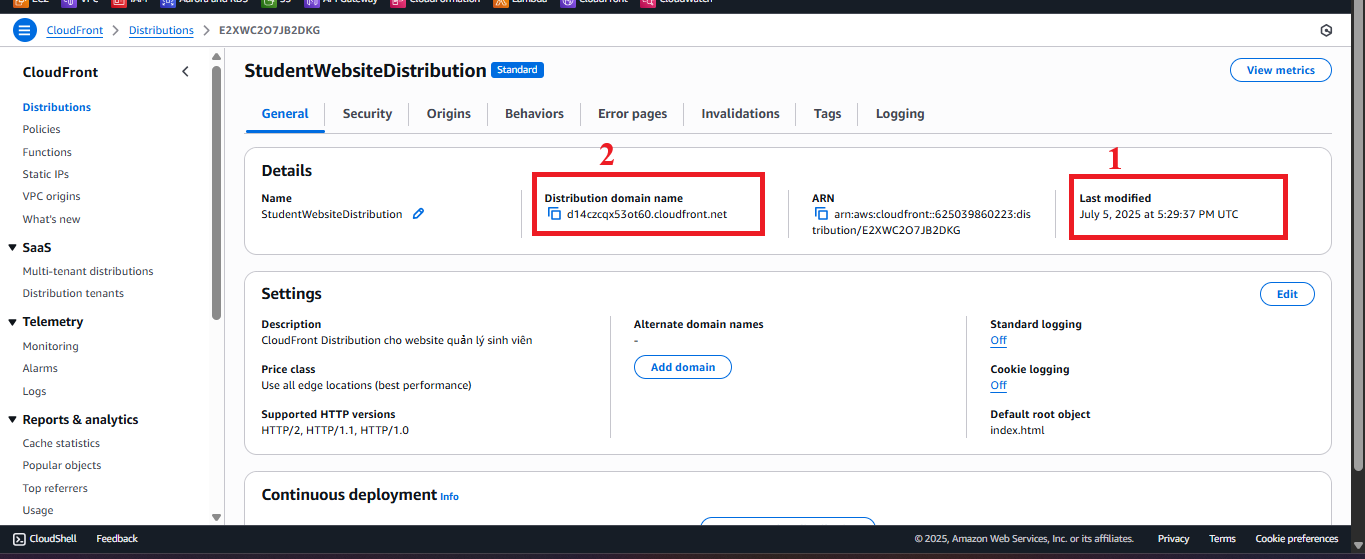
Figure 7: Completed Invalidation Status. - Error Handling:
- Invalidation not created: Check if the IAM role has
cloudfront:CreateInvalidationpermissions:{ "Version": "2012-10-17", "Statement": [ { "Effect": "Allow", "Action": "cloudfront:CreateInvalidation", "Resource": "arn:aws:cloudfront::<AWS_ACCOUNT_ID>:distribution/<DISTRIBUTION_ID>" } ] }- Replace
<AWS_ACCOUNT_ID>and<DISTRIBUTION_ID>with actual values (find in CloudFront > Distributions).
- Replace
- Status not switching to Completed:
- Wait 5–10 minutes more, as processing time depends on the number of edge locations.
- Recreate the invalidation if necessary.
- Invalidation not created: Check if the IAM role has
-
Access Distribution Domain Name to Verify
- In CloudFront > Distributions, copy the Distribution domain name of
StudentWebsiteDistribution(e.g.,https://d12345678.cloudfront.net). - Open your browser and access this URL.
- Expected result:
- The web interface should display the latest version of
index.html,styles.css, andscripts.js(if updated in S3, section 6.2). - The input form, student table, and functional buttons (Save, View, Backup) should display correctly, using Tailwind CSS and Poppins font.
- The web interface should display the latest version of
- Example Check:
- Upload a new version of
styles.css(e.g., change the gradient color) orindex.html(e.g., add a new field) to the S3 Bucketstudent-management-website-2025(section 6.2). - Create an invalidation with
/*. - Access the CloudFront URL and verify the interface reflects the changes (e.g., new gradient or the new field).
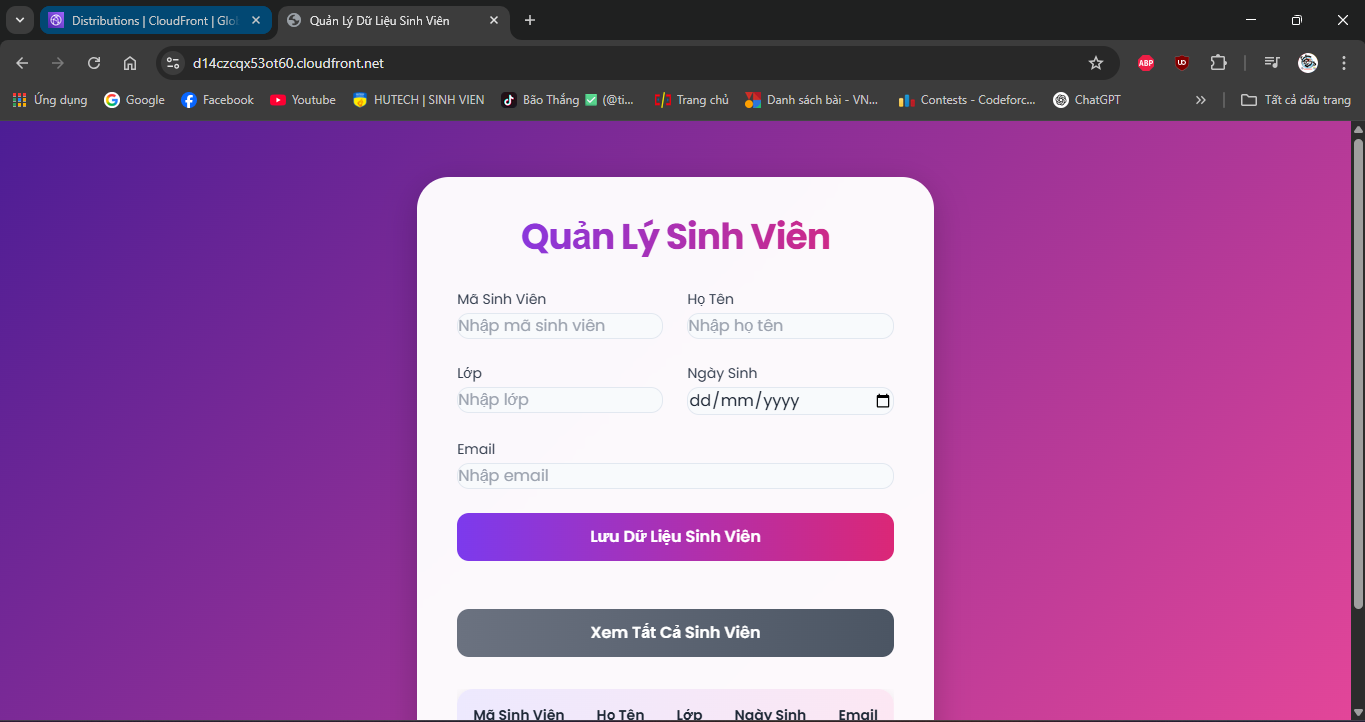
Figure 8: Web Interface via CloudFront After Invalidation.
- Upload a new version of
- In CloudFront > Distributions, copy the Distribution domain name of
-
Verify Interface and API Functionality
- Check the web interface via the CloudFront URL (e.g.,
https://d12345678.cloudfront.net):- Interface displays:
- The input form (supports fields
studentid,name,class,birthdate,email) works correctly. - The student table displays data from the GET /students API.
- The functional buttons (Save, View, Backup) work, using Tailwind CSS and Poppins font.
- The input form (supports fields
- API Functionality:
- Save student data: Enter data into the form, click Save, verify the record is saved to DynamoDB
studentDataand the confirmation email is sent via SES.curl -X POST https://abc123.execute-api.us-east-1.amazonaws.com/prod/students \ -H "x-api-key: xxxxxxxxxxxxxxxxxxxx" \ -H "Content-Type: application/json" \ -d '{"studentid":"SV005","name":"Pham Thi E","class":"CNTT05","birthdate":"2001-05-05","email":"student5@example.com"}' - View student list: Click View, check that the table displays data from the GET /students API.
curl -X GET https://abc123.execute-api.us-east-1.amazonaws.com/prod/students \ -H "x-api-key: xxxxxxxxxxxxxxxxxxxx" - Backup data: Click Backup, verify the file is created in the S3 Bucket
student-backup-20250706and the notification email is sent via SES.curl -X POST https://abc123.execute-api.us-east-1.amazonaws.com/prod/backup \ -H "x-api-key: xxxxxxxxxxxxxxxxxxxx" \ -H "Content-Type: application/json"
- Save student data: Enter data into the form, click Save, verify the record is saved to DynamoDB
- Interface displays:
- Error Handling:
- Content not updated:
- Check if the invalidation status is Completed in the Invalidations tab.
- Recreate the invalidation with
/*if needed. - Verify that the new files (
index.html,styles.css,scripts.js) are uploaded to S3 correctly (section 6.2). - Check the Bucket Policy (section 7.1) for OAI access:
{
    "Version": "2012-10-17",
    "Statement": [
        {
            "Sid": "AllowCloudFrontOAI",
            "Effect": "Allow",
            "Principal": {
                "AWS": "arn:aws:iam::cloudfront:user/CloudFront Origin Access Identity <OAI_ID>"
            },
            "Action": "s3:GetObject",
            "Resource": "arn:aws:s3:::student-management-website-2025/*"
        }
    ]
}
- 403 Forbidden:
- Check the OAI configuration (section 7.1) in CloudFront and the Bucket Policy of S3.
- Ensure
index.html,styles.css, andscripts.jsare uploaded to S3 (section 6.2). - Verify Block public access is enabled (except Block public access for bucket policies) in S3 (section 7.1).
- 404 Not Found:
- Check that Default Root Object is set to
index.htmlin CloudFront > Distributions > General. - Verify Static Website Hosting (section 6.3) is enabled with
index.htmlas the Index document in S3.
- Check that Default Root Object is set to
- Incorrect Interface:
- Open Developer Tools > Console to check errors loading
styles.cssorscripts.js. - Check the paths in
index.html(e.g.,<link href="styles.css">,<script src="scripts.js">) match the directory structure in S3.
- Open Developer Tools > Console to check errors loading
- CORS Errors when Calling API:
- Check the CORS configuration in API Gateway (section 4.7) with
Access-Control-Allow-Origin: https://d12345678.cloudfront.net. - Ensure
scripts.jssends the API request with the correct Invoke URL (e.g., https://abc123.execute-api.us-east-1.amazonaws.com/prod) and headerx-api-key: <StudentApiKey>.
- Check the CORS configuration in API Gateway (section 4.7) with
- API Errors:
- Check
StudentApiKey,StudentUsagePlan(section 4.9), and CloudWatch logs for Lambda.
- Check
- Content not updated:
- Check the web interface via the CloudFront URL (e.g.,
Important Notes
| Factor | Details |
|---|---|
| Security | Ensure the Bucket Policy only allows OAI access to S3 (section 7.1). Avoid embedding StudentApiKey in scripts.js. Use CloudFront Functions to add the x-api-key header: javascript <br> function handler(event) { <br> var request = event.request; <br> request.headers['x-api-key'] = { value: 'xxxxxxxxxxxxxxxxxxxx' }; <br> return request; <br> } <br> |
| Optimization | Enable CloudFront Standard Logs to track access: In CloudFront > Distribution > General > Logging, select On, and specify a log bucket (e.g., student-web-logs-20250706). Use AWS CLI to automate invalidation: bash <br> aws cloudfront create-invalidation --distribution-id <DISTRIBUTION_ID> --paths "/*" <br> |
| System Integration | Update CORS in API Gateway (section 4.7) with Access-Control-Allow-Origin: https://d12345678.cloudfront.net. Ensure POST /students, GET /students, POST /backup work with Invoke URL and StudentApiKey. |
| Integration Testing | Access the CloudFront URL (https://d12345678.cloudfront.net) and check: - POST /students: Save records, send SES email. - GET /students: Display table. - POST /backup: Create file in student-backup-20250706, send email. Use Developer Tools > Network to check API requests. |
| Error Handling | Content not updated: Check invalidation status, S3 files, and Bucket Policy. 403 Forbidden: Check OAI, Bucket Policy, s3:GetObject permission. 404 Not Found: Verify index.html is Default Root Object, file exists in S3. CORS: Check Access-Control-Allow-Origin header in Lambda (section 3) and API Gateway (section 4.7). 429: Check rate/burst/quota limits in StudentUsagePlan (section 4.3). |
Best Practice Tip: Create an invalidation whenever updating files in S3. Test the CloudFront URL immediately after the Completed status. Use AWS CLI to automate invalidations:
aws cloudfront create-invalidation --distribution-id <DISTRIBUTION_ID> --paths "/*".
Conclusion
The Invalidation has been created for CloudFront Distribution StudentWebsiteDistribution, ensuring cache content is refreshed, and the web interface displays the latest version from S3. The system is integrated with the student API and is ready for operation.
Next step: Proceed to Set Up System Backup to begin system backup deployment!