Enable CORS to Support Frontend Access
Objective: Enable CORS (Cross-Origin Resource Sharing) on the
studentAPI (created in section 4.1) to allow the web interface (running on CloudFront, using Tailwind CSS) to send requests to the GET /students, POST /students, and POST /backup endpoints. CORS will be configured on the/studentsand/backupresources by adding the OPTIONS method and setting the necessary headers (Access-Control-Allow-Methods,Access-Control-Allow-Headers,Access-Control-Allow-Origin), ensuring smooth and secure integration with the frontend.
Overview of CORS in API Gateway
- CORS is a security mechanism of the browser that requires the server (API Gateway) to allow cross-origin requests from a different domain (e.g.,
https://d12345678.cloudfront.net) compared to the API domain (e.g.,https://api-id.execute-api.us-east-1.amazonaws.com). - In this system, CORS needs to be enabled for the
/students(GET, POST) and/backup(POST) resources so that the web interface can:- Send a GET /students request to retrieve the student list (function
getStudentData, section 4.4). - Send a POST /students request to save student information (function
insertStudentData, section 4.5). - Send a POST /backup request to back up the data (function
BackupDynamoDBAndSendEmail, section 4.6).
- Send a GET /students request to retrieve the student list (function
- Enabling CORS requires:
- Adding the OPTIONS method for each resource to handle preflight requests from the browser.
- Setting the CORS headers (
Access-Control-Allow-Origin,Access-Control-Allow-Methods,Access-Control-Allow-Headers) in the OPTIONS, GET, and POST responses. - Ensuring that the Lambda functions (
getStudentData,insertStudentData,BackupDynamoDBAndSendEmail) return the headerAccess-Control-Allow-Origin: '*'.
- After enabling CORS, the API needs to be deployed (section 4.8) for the changes to take effect.
Prerequisites
You need to complete section 4.1 (create student API), section 4.2 (create StudentApiKey), section 4.3 (create StudentUsagePlan), section 4.4 (create GET /students method), section 4.5 (create POST /students method), section 4.6 (create /backup resource and POST /backup method), and section 3 (create Lambda functions getStudentData, insertStudentData, BackupDynamoDBAndSendEmail, DynamoDB studentData table, S3 bucket student-backup-20250706, SES email verification). Ensure that your AWS account is set up and the AWS region is us-east-1.
Detailed Actions
-
Access AWS Management Console
-
Open your browser and log into the AWS Management Console with your AWS account.
-
In the search bar at the top, type API Gateway and select the Amazon API Gateway service to access the management interface.
-
Check the AWS region: Make sure you are working in the primary AWS region (assumed
us-east-1for synchronization with previous sections), check the region in the top-right corner of the AWS Console. This region must match thestudentAPI, the Lambda functions (getStudentData,insertStudentData,BackupDynamoDBAndSendEmail),studentDataDynamoDB table,student-backup-20250706S3 bucket, and SES.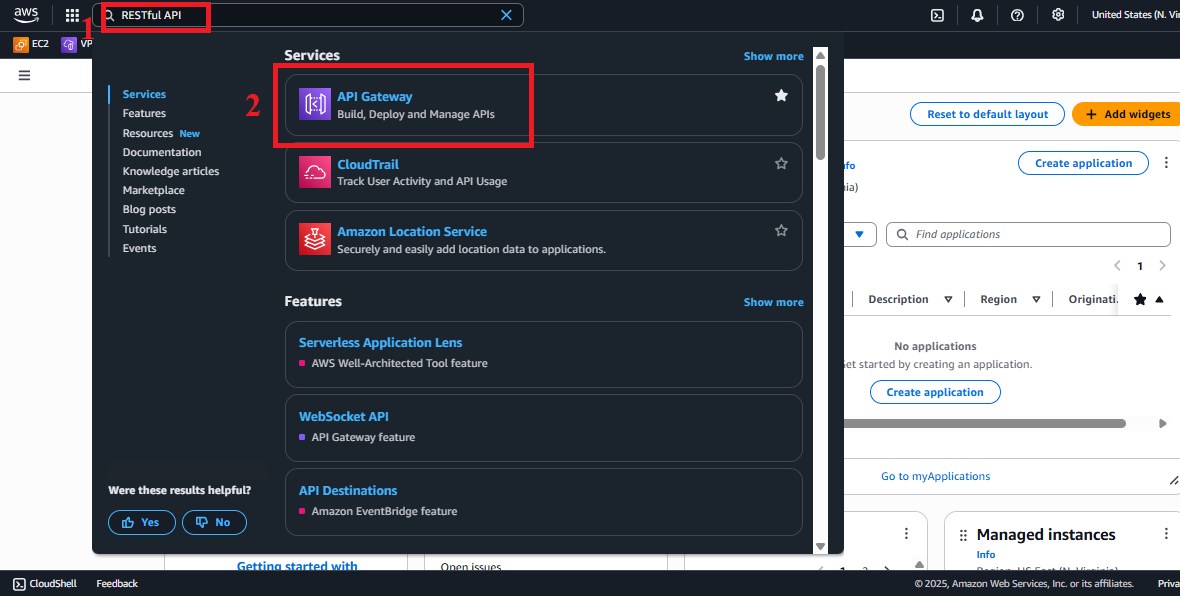
Figure 1: AWS Console interface with the API Gateway search bar.
-
-
Navigate to APIs
-
In the main interface of Amazon API Gateway, look at the left navigation menu.
-
Select APIs to view the list of existing APIs.
-
The list should display the
studentAPI (created in section 4.1). If not, check the AWS region again or refresh the page.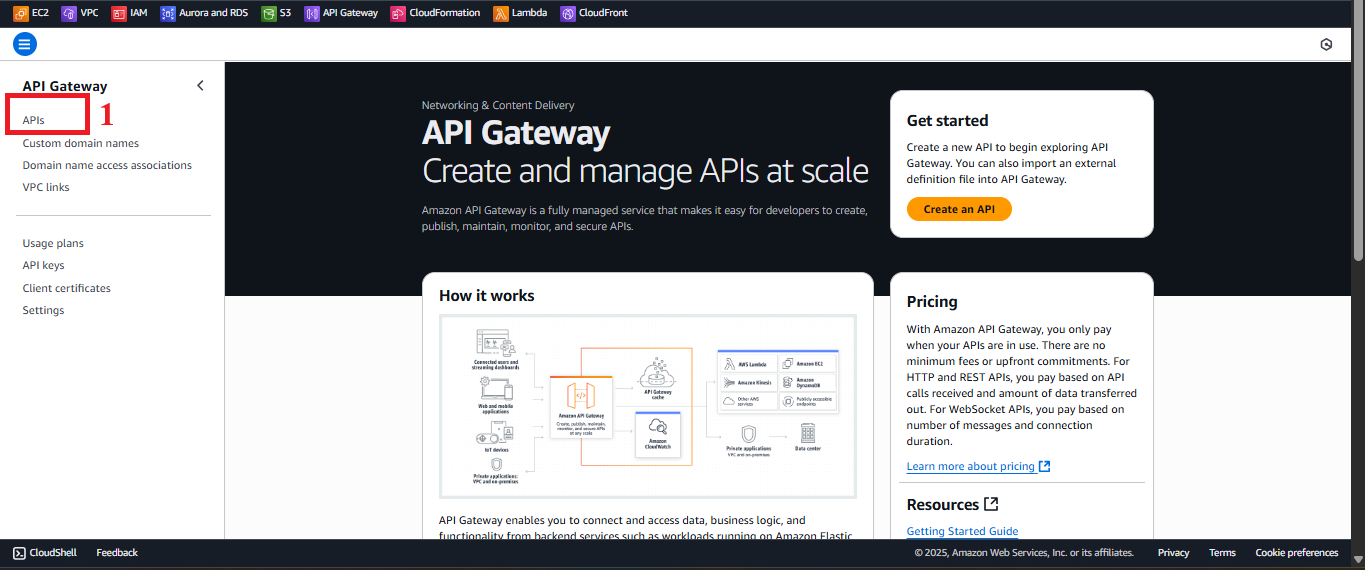
Figure 2: Navigation menu with the APIs option.
-
-
Select the student API
-
In the APIs list, find and select the
studentAPI. -
You will be redirected to the API management page for
student, showing options like Resources, Stages, API Keys, etc. -
Select Resources from the left menu to start configuring CORS.
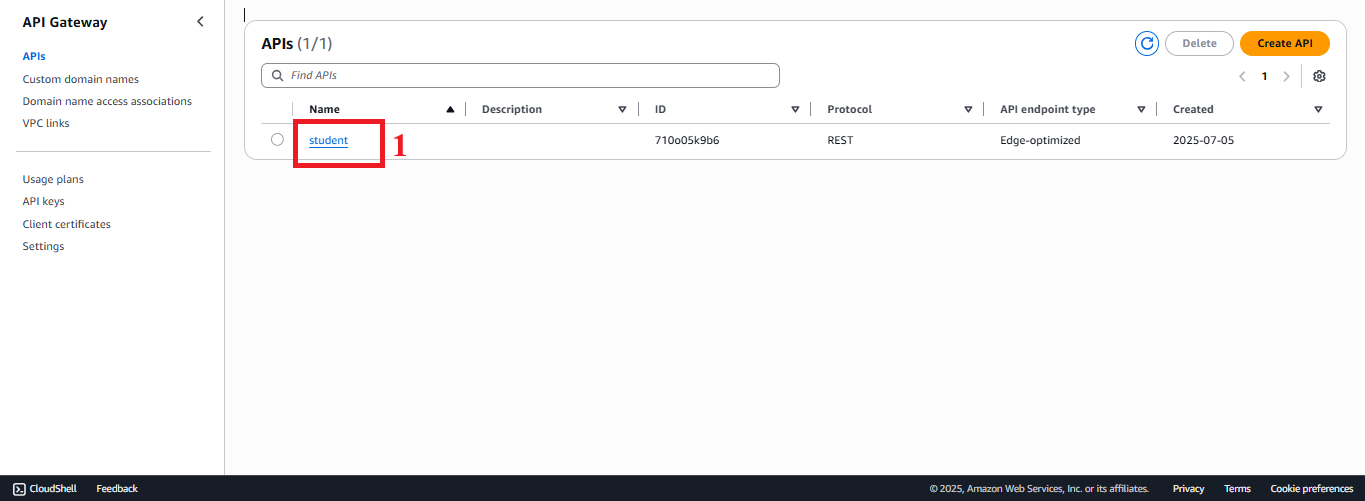
Figure 3: Student API management page with the Resources option.
-
-
Enable CORS for the /students Resource
-
In the Resources interface, you will see a resource tree with the root
/and the/studentsresource (created in section 4.4). -
Select the
/studentsresource. -
Click Actions > Enable CORS.
-
In the Enable CORS interface:
- Access-Control-Allow-Methods: Select GET, POST, and OPTIONS.
- Explanation:
- GET and POST correspond to the methods created (sections 4.4, 4.5).
- OPTIONS is the preflight method that the browser sends to check CORS before sending the actual request (GET or POST).
- Explanation:
- Access-Control-Allow-Headers: Keep the default or ensure it includes
Content-Type,x-api-key(as the methods require the API Key in thex-api-keyheader, sections 4.4, 4.5).- Example:
Content-Type,x-api-key,Authorization.
- Example:
- Access-Control-Allow-Origin: Enter
'*'(to allow all domains) or a specific CloudFront domain (e.g.,https://d12345678.cloudfront.net) for enhanced security. - Access-Control-Max-Age: Keep the default (600 seconds) for the browser to cache the preflight response.
- Access-Control-Allow-Methods: Select GET, POST, and OPTIONS.
-
Click Enable CORS and replace existing CORS headers to apply.
-
AWS will automatically:
- Create an OPTIONS method for the
/studentsresource. - Configure Mock Integration for OPTIONS with the response containing the necessary CORS headers.
- Update the Method Response for GET and POST to include the
Access-Control-Allow-Originheader.
- Create an OPTIONS method for the
-
Click Save to save the configuration.
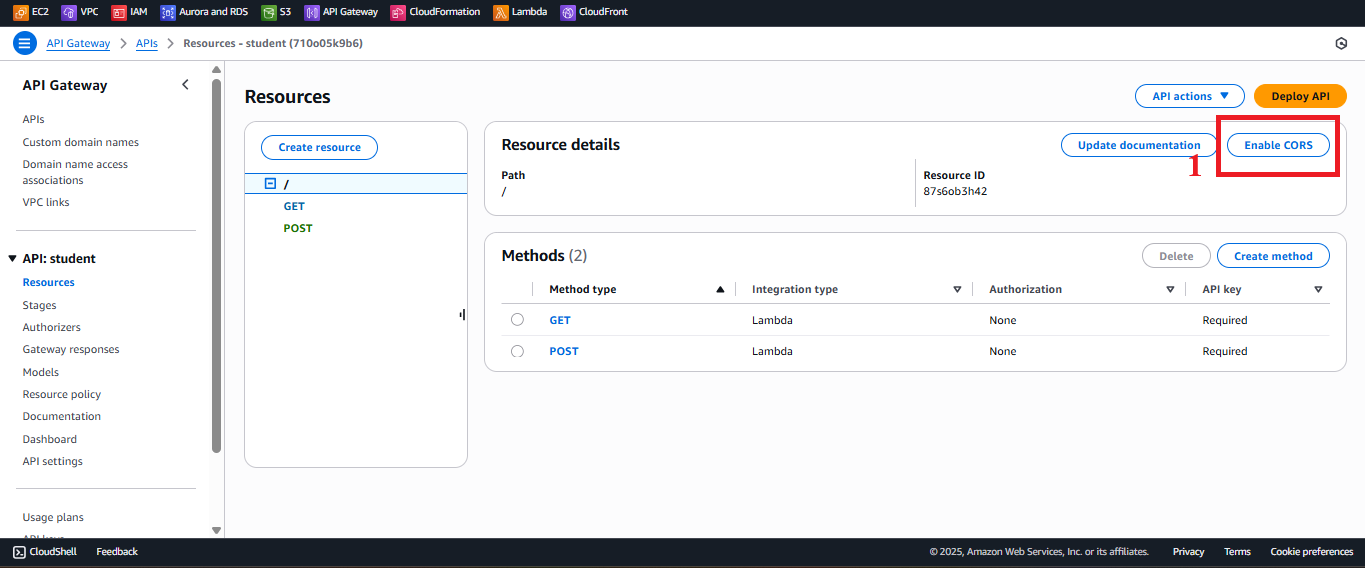
Figure 4: Enable CORS for the /students resource.
-
-
Enable CORS for the /backup Resource
-
In the Resources interface, select the
/backupresource (created in section 4.6). -
Click Actions > Enable CORS.
-
In the Enable CORS interface:
- Access-Control-Allow-Methods: Select POST, OPTIONS.
- Explanation:
- POST corresponds to the method created (section 4.6).
- OPTIONS handles the preflight request for
/backup.
- Explanation:
- Access-Control-Allow-Headers: Ensure it includes
Content-Type,x-api-key. - Access-Control-Allow-Origin: Enter
'*'or the specific CloudFront domain (e.g.,https://d12345678.cloudfront.net). - Access-Control-Max-Age: Keep the default (600 seconds).
- Access-Control-Allow-Methods: Select POST, OPTIONS.
-
Click Enable CORS and replace existing CORS headers to apply.
-
AWS will automatically create the OPTIONS method for
/backupand update the Method Response for POST. -
Click Save to save the configuration.
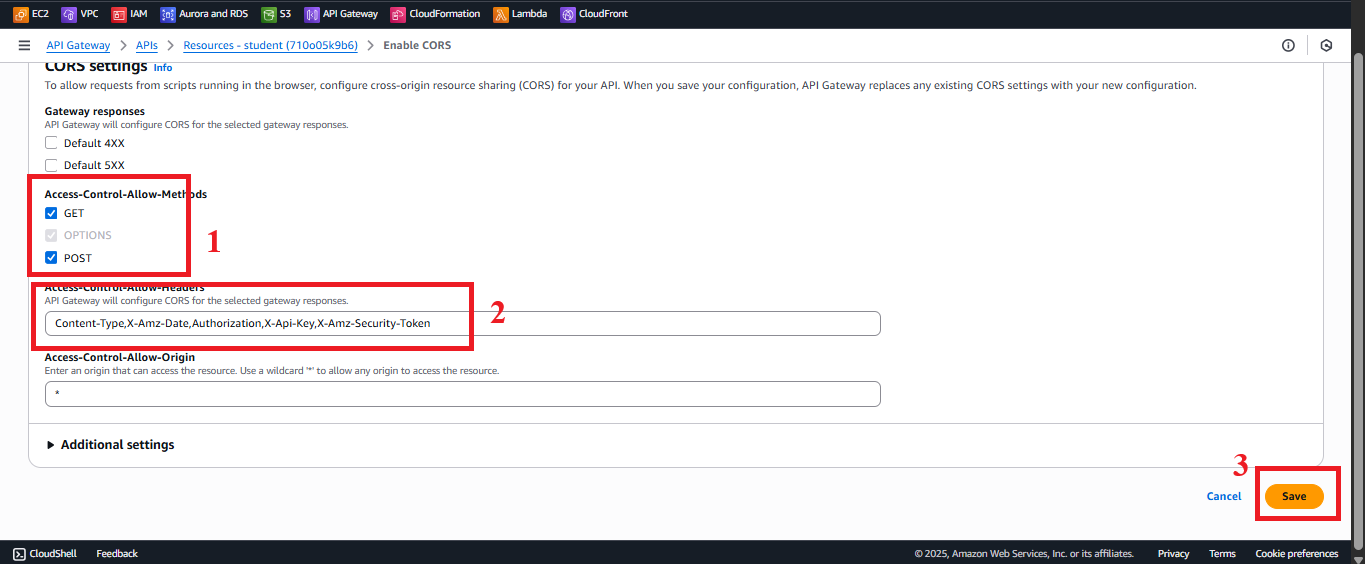
Figure 5: Enable CORS for the /backup resource.
-
-
Verify the Status of CORS Activation
-
After enabling CORS, you will see the message: “Successfully enabled CORS” for each resource (
/students,/backup). -
To verify the configuration:
- In Resources, select the
/studentsresource:- Verify the OPTIONS method appears with Mock Integration.
- In the Method Response for GET, POST, and OPTIONS, check the
Access-Control-Allow-Origin: '*'header. - In the Integration Response for OPTIONS, check that the response includes:
{
    "Access-Control-Allow-Origin": "*",
    "Access-Control-Allow-Methods": "GET,POST,OPTIONS",
    "Access-Control-Allow-Headers": "Content-Type,x-api-key,Authorization"
}
- Repeat the checks for the
/backupresource (only POST and OPTIONS).
- In Resources, select the
-
If you encounter errors:
- “CORS headers already exist”: Select Replace existing CORS headers to overwrite.
- “AccessDenied”: Check that the IAM role for the AWS account has the
apigateway:PUTpermission to edit the method. - “OPTIONS method not found”: Ensure that you clicked Enable CORS correctly.
-
Important Note: CORS will not work until you deploy the API to a stage (section 4.8).
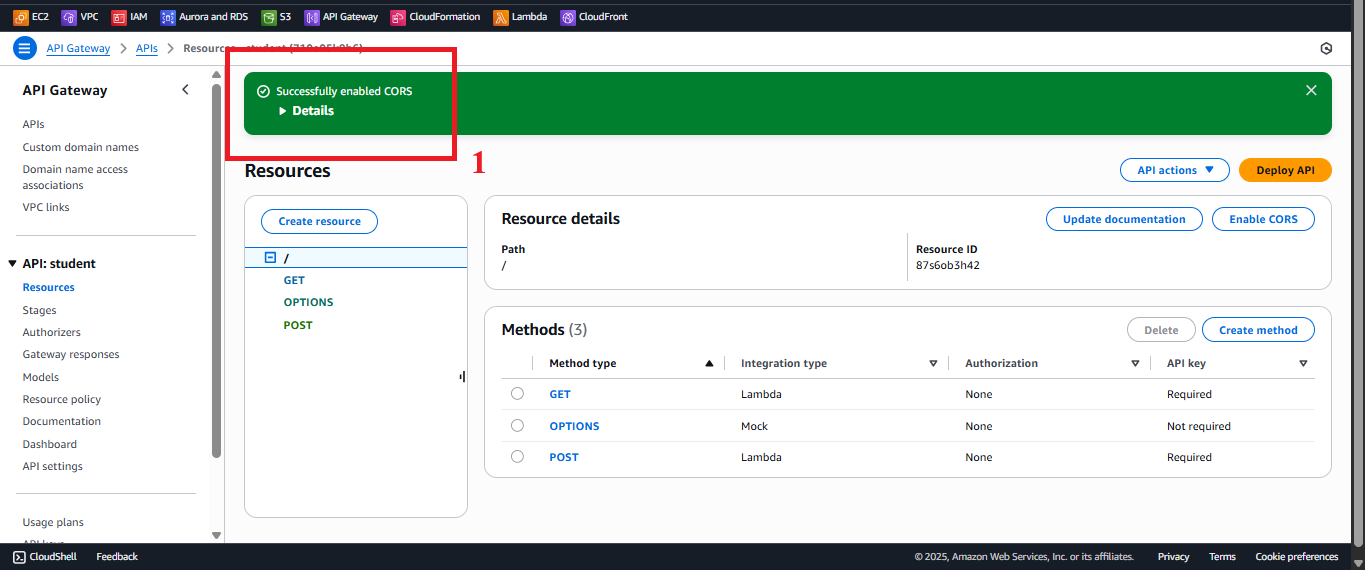
Figure 6: Success message after enabling CORS.
-
Important Notes
| Factor | Details |
|---|---|
| Correct CORS Configuration | - Access-Control-Allow-Origin: Use '*' to allow all domains (suitable for testing). In production, specify a specific CloudFront domain (e.g., https://d12345678.cloudfront.net) for enhanced security. - Access-Control-Allow-Headers: Ensure it includes x-api-key since the methods require an API Key (StudentApiKey, section 4.2). - Access-Control-Allow-Methods: Include OPTIONS to handle preflight requests. |
| Integration with Lambda | The Lambda functions (getStudentData, insertStudentData, BackupDynamoDBAndSendEmail) must return the header Access-Control-Allow-Origin: '*' in the response to avoid CORS errors. This is configured in the Lambda code in sections 3.1, 3.2, 3.3. |
| API Key Security | Requests to the endpoints (GET /students, POST /students, POST /backup) must include the x-api-key: <StudentApiKey> header. Store the API Key in AWS Secrets Manager for enhanced security (see section 4.2). |
| AWS Region | Ensure the region us-east-1 matches the student API, the Lambda functions, studentData DynamoDB table, student-backup-20250706 S3 bucket, and SES. |
| Error Handling | - If the web interface reports a CORS error (e.g., “No ‘Access-Control-Allow-Origin’ header”): - Check that Method Response for GET, POST, and OPTIONS includes the Access-Control-Allow-Origin header. - Check that the Integration Response for OPTIONS returns the correct CORS headers. - Ensure the Lambda functions return Access-Control-Allow-Origin: '*'. - If you encounter a 403 "Forbidden" error when calling the API: - Check that the StudentApiKey is valid and linked to the Usage Plan (sections 4.3, 4.9). - Ensure API Key Required: true is set in the Method Request (sections 4.4, 4.5, 4.6). - If you encounter a 500 error from Lambda, check the logs in CloudWatch (log groups /aws/lambda/getStudentData, /aws/lambda/insertStudentData, /aws/lambda/BackupDynamoDBAndSendEmail). |
| Optimization | - Specify the CloudFront domain in Access-Control-Allow-Origin instead of '*' for enhanced security. - Consider using AWS WAF with API Gateway to protect against DDoS attacks or API Key abuse. - If you need detailed preflight request checking, enable CloudWatch Logs for API Gateway: - In API Gateway > Settings > CloudWatch Logs, select Enable CloudWatch Logs and set the log level (e.g., INFO). - Add Request Validator for POST /students and POST /backup to validate the JSON body (see section 4.5). |
| Early Testing | - After enabling CORS, verify that the OPTIONS method appears in Resources for /students and /backup. - After deploying the API (section 4.8), test CORS by calling the endpoint from the web interface or using Postman/curl. - Check from the web interface (open Developer Tools > Network in the browser) to verify that no CORS errors occur when calling GET /students, POST /students, or POST /backup. - If you receive a CORS error, check the headers in Method Response and Integration Response, or the CloudWatch logs for API Gateway. |
| Web Interface Integration Testing | After deploying the API (section 4.8) and linking the Usage Plan (section 4.9), call the endpoints (GET /students, POST /students, POST /backup) from the web interface (using Tailwind CSS, running on CloudFront). |
Practical Tip: Verify the Method Response and Integration Response configurations for OPTIONS before deploying the API. Test the endpoints from the web interface using Developer Tools to ensure no CORS errors and that the data is returned correctly.
Conclusion
CORS has been successfully enabled on the /students and /backup resources in the student API, allowing the web interface to call the GET /students, POST /students, and POST /backup endpoints without encountering CORS errors.
Next step: Move to Deploy API for production use to continue!