Create an API Key to Secure Access
Objective: Create an API Key named
StudentApiKeyin AWS API Gateway to secure the endpoints of thestudentAPI (created in section 4.1), ensuring that only requests from the web interface (running on CloudFront) or clients with valid keys can access. The API Key will be used in thex-api-keyheader when calling endpoints (GET /students,POST /students,POST /backup) and will be linked to a Usage Plan (section 4.3) to manage access limits.
Overview of API Key in API Gateway
- An API Key is a string used to authenticate requests sent to API Gateway, preventing unauthorized access.
- The API Key is sent in the
x-api-keyheader of each HTTP request (e.g.,GET https://api-id.execute-api.us-east-1.amazonaws.com/prod/students). - In this system,
StudentApiKeywill secure the endpoints integrated with Lambda functions (getStudentData,insertStudentData,BackupDynamoDBAndSendEmail). - The API Key will be integrated into the web interface (using Tailwind CSS, running on CloudFront) to safely call the API.
Prerequisites
You need to complete section 4.1 (create the student API) and section 3 (create Lambda functions getStudentData, insertStudentData, BackupDynamoDBAndSendEmail, DynamoDB table studentData, S3 bucket student-backup-20250706, SES email verification). Ensure your AWS account is set up, and the AWS region is us-east-1.
Detailed Steps
-
Access the AWS Management Console
-
Open your browser and log in to the AWS Management Console with your AWS account.
-
In the search bar at the top, type API Gateway and select the Amazon API Gateway service to access the management interface.
-
Check the AWS region: Make sure you are working in the primary AWS region (e.g.,
us-east-1), and check the region at the top right corner of the AWS Console. This region should match thestudentAPI (created in section 4.1) and Lambda functions (getStudentData,insertStudentData,BackupDynamoDBAndSendEmail).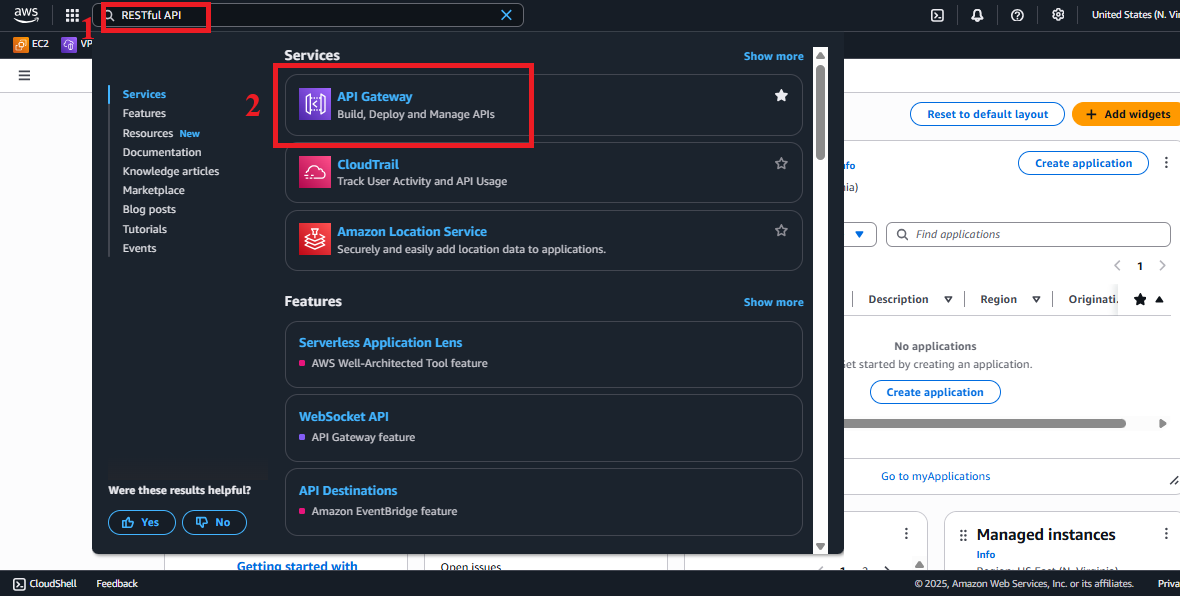 Figure 1: AWS Console Interface with API Gateway Search Bar.
-
-
Navigate to the API Keys Section
-
In the main Amazon API Gateway interface, look at the left navigation menu.
-
Select API Keys to view the list of existing API Keys. If you haven’t created any key, the list will be empty.
-
The interface will show options to create or manage API Keys.
 Figure 2: Navigation Menu with API Keys Option.
-
-
Initiate the API Key Creation Process
-
In the API Keys interface, click the Create API Key button at the top right to start creating a new key.
 Figure 3: Create API Key Button in the API Keys Interface.
-
-
Configure the API Key
-
In the Create API Key section:
- Name: Enter
StudentApiKeyexactly. This name helps you easily identify the key when linking it with the Usage Plan. - Description: Enter API Key to secure access to StudentManagementAPI (or a similar description for clarity).
- API Key: Select Auto Generate to have AWS create a random string, ensuring security.
- Note: You can enter a custom key, but Auto Generate is recommended to avoid easily guessable keys.
- Enabled: Ensure this option is selected so the key can be used immediately after creation.
- Name: Enter
-
Click Save to create the API Key.
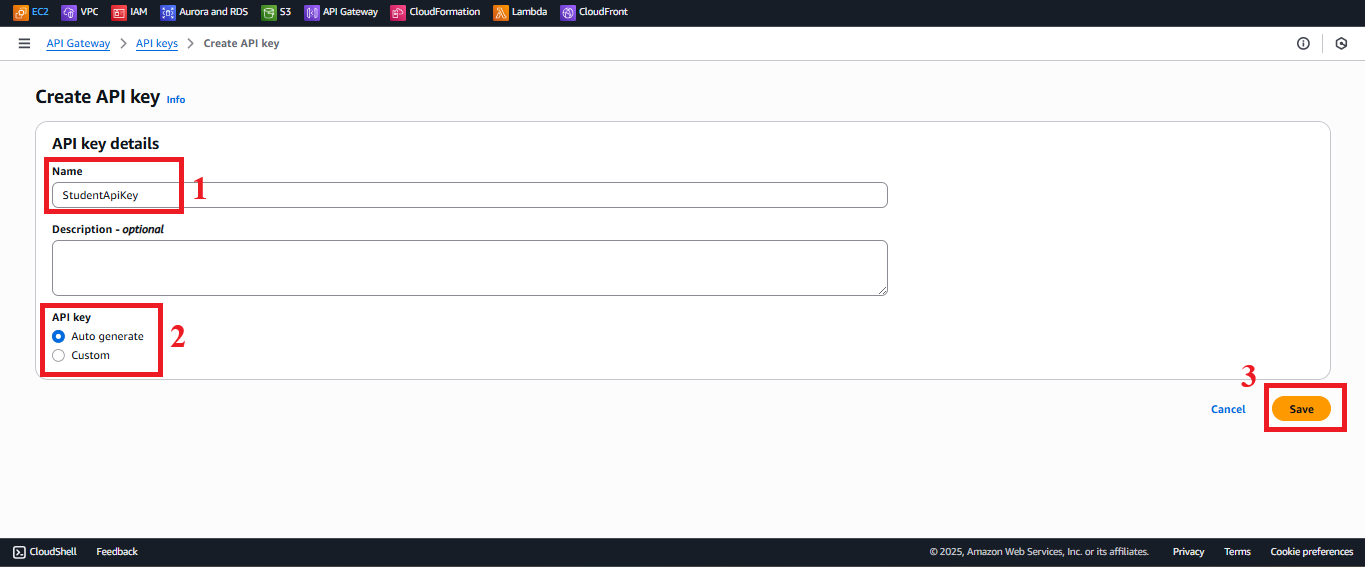 Figure 4: API Key Configuration Interface.
-
-
Check the Status and Copy the API Key
-
After clicking Save, you will see the message: “Successfully created API Key ‘StudentApiKey’.”
-
In the API Keys list, select
StudentApiKeyto view details. -
Click Show next to API Key to display the key value (e.g.,
xxxxxxxxxxxxxxxxxxxx). -
Copy the API Key:
- Copy the key value and store it safely (e.g., in a local security file, AWS Secrets Manager, or a password manager).
- Important Note: The API Key is shown only once immediately after creation. If lost, you must create a new key and update it in the Usage Plan (section 4.3) and the web interface.
-
This API Key will be used in the web interface to call the endpoints (
GET /students,POST /students,POST /backup) by adding it in thex-api-keyheader.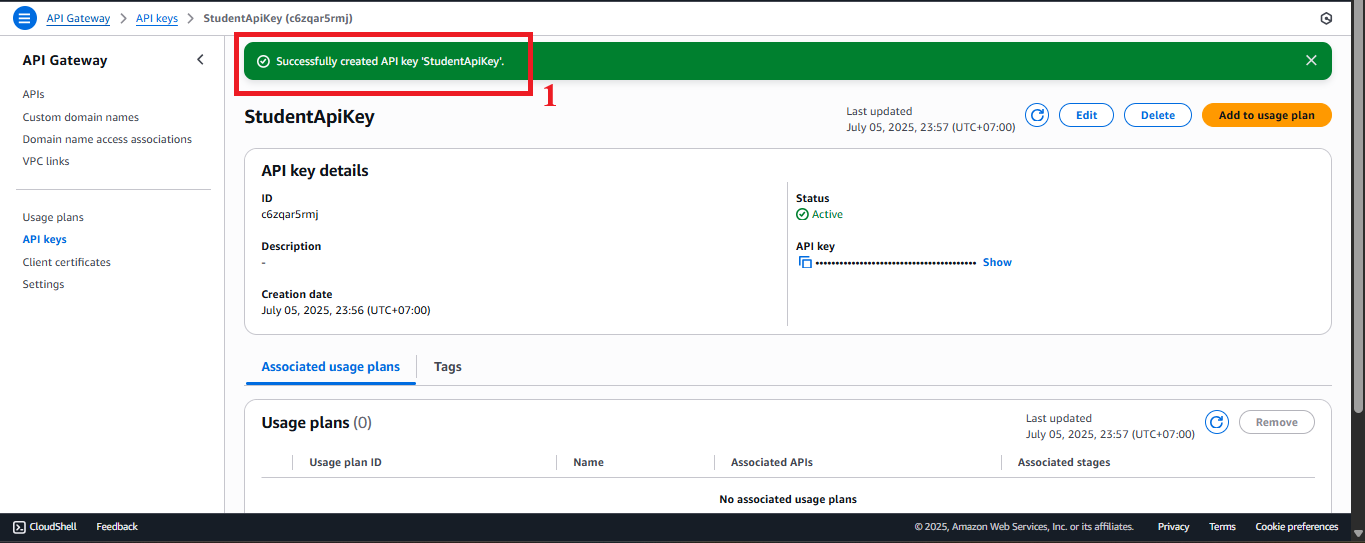 Figure 5: Success Message and API Key Details.
-
Important Notes
| Element | Details |
|---|---|
| API Key Security | Do not embed the API Key directly in the JavaScript of the web interface (running on CloudFront). Instead, use environment variables or AWS Secrets Manager to securely store and retrieve the key. - Go to AWS Secrets Manager > Store a new secret > Choose Other type of secret > Enter the API Key. - Name the secret (e.g., student-api-key) and retrieve it in the web interface code via the AWS SDK. |
| AWS Region | The API Key operates across the entire AWS account, not limited by region. However, ensure that the student API and Lambda functions are in the same region (us-east-1) to avoid integration issues. |
| Error Handling | If you do not see the success message or encounter an “AccessDenied” error: - Check if your AWS account IAM permissions include apigateway:POST to create API Keys. - Ensure you are in the correct AWS region (us-east-1). If the API Key does not show up, refresh the page or check the API Keys list again. |
| Optimization | - After creating the key, link the API Key with a Usage Plan (section 4.3) to enforce access limits (rate limiting, quota). - Consider using AWS WAF with API Gateway for additional protection against attacks (e.g., DDoS). - If you need multiple API Keys (for different clients), create additional keys and manage them within the same Usage Plan. |
| Early Testing | - After creating the API Key, verify that it appears in the API Keys list and that the key value is safely copied. - Test the key by making a request to the API (after configuring methods and deploying in steps 4.4–4.8) using Postman or curl: curl -X GET https://api-id.execute-api.us-east-1.amazonaws.com/prod/students -H "x-api-key: xxxxxxxxxxxxxxxxxxxx" |
| Web Interface Integration Testing | - After creating the API Key, integrate the key into the web interface (using Tailwind CSS, running on CloudFront) to call the endpoints. - Ensure that the API Key is sent in the x-api-key header when calling the endpoints (GET /students, POST /students, POST /backup). |
Practical Tip: Securely store the API Key immediately after creation and test the integration with a test request (using Postman or curl) before embedding it into the web interface.
Conclusion
The StudentApiKey has been successfully created in AWS API Gateway, ready to be linked with a Usage Plan and secure the endpoints of the student API.
Next step: Go to Set Up Usage Plan (Access Plan) to continue!