Configure Lambda Function BackupDynamoDBAndSendEmail
Objective: Create and configure the
BackupDynamoDBAndSendEmailLambda function to back up all data from the DynamoDBstudentDatatable into an S3 bucket as a JSON file, create a pre-signed URL, and send a notification email containing the download link via SES. The function uses Python 3.13, architecturex86_64, and is assigned the IAM roleDynamoDBBackupRole(created in step 2.3). The function will return a JSON response to integrate with other systems (if needed) and log to CloudWatch for monitoring.
Overview of the BackupDynamoDBAndSendEmail Function
The BackupDynamoDBAndSendEmail function performs the following tasks:
- Reads all data from the
studentDatatable (fieldsstudentid,name,class,birthdate,email) using theScanoperation. - Temporarily stores the data as a JSON file in the
/tmpdirectory of the Lambda environment. - Uploads the JSON file to an S3 bucket with a timestamped filename (e.g.,
backups/backup-20250707-0409.json). - Creates a pre-signed URL (expires in 1 hour) to access the backup file.
- Sends a notification email via SES with a beautiful HTML content, containing the download link and expiration time.
- Returns a JSON response confirming the backup status and email sending.
Prerequisites
You need to complete the preparation steps in section 2 (IAM Role DynamoDBBackupRole, DynamoDB studentData table, SES email verification, S3 bucket student-backup-20250706). Ensure your AWS account is set up and the AWS region is us-east-1.
Detailed Steps
-
Access AWS Management Console
-
Open your browser and log in to the AWS Management Console with your AWS account.
-
In the top search bar, type Lambda and select AWS Lambda to access the management interface.
-
Ensure you are working in the correct AWS region (e.g.,
us-east-1), check the region in the top-right corner of the AWS Console. This region must match the DynamoDBstudentDatatable, the S3student-backup-20250706bucket, and SES. Figure 1: AWS Console Interface with Lambda search bar.
-
-
Navigate to the Functions Section
-
In the AWS Lambda main interface, look at the left navigation menu.
-
Select Functions to see the list of existing Lambda functions. If no functions are created, the list will be empty.
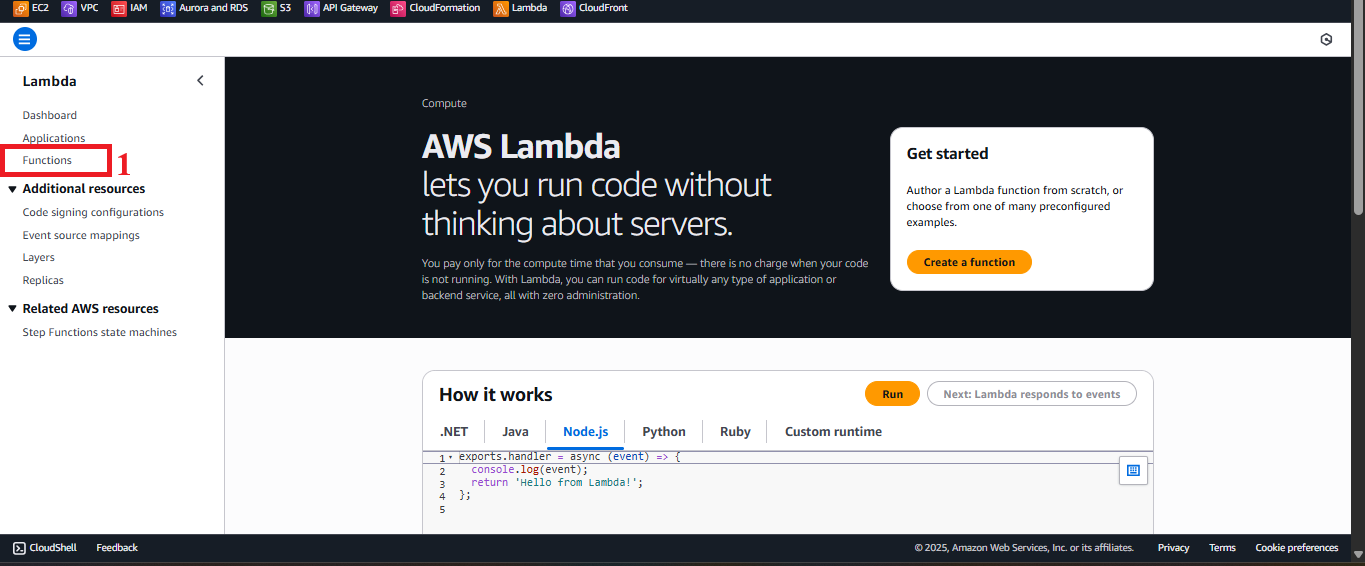
Figure 2: Navigation menu with Functions option.
-
-
Start Creating the Function
-
In the Functions interface, click the Create function button in the top-right corner to start creating a new function.
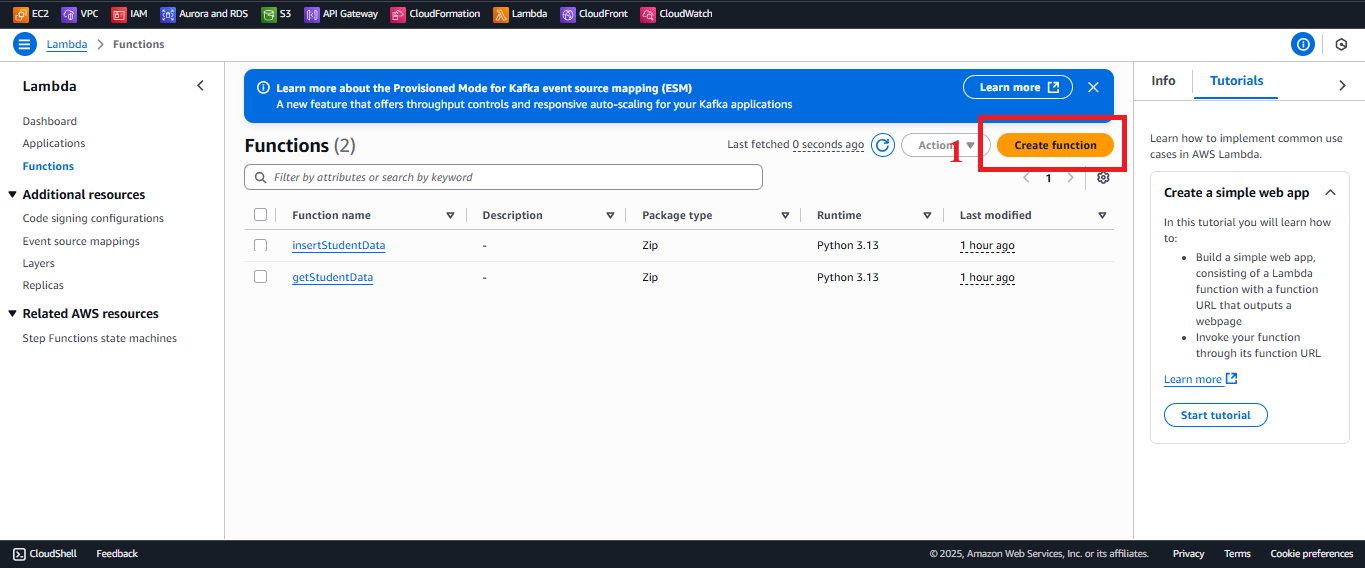 Figure 3: Create function button in the Functions interface.
-
-
Configure Basic Function Information
-
In the Function type section, select Author from scratch to write your own code.
-
In the Function name section, enter
BackupDynamoDBAndSendEmail. This name will be used when integrating with other services (e.g., CloudWatch Events/EventBridge for automatic backups). -
In the Runtime section, select Python 3.13 (the required latest Python version). If Python 3.13 is unavailable, select the latest supported version (e.g., Python 3.12 or 3.11).
-
In the Architecture section, select
x86_64to ensure compatibility with the standard architecture.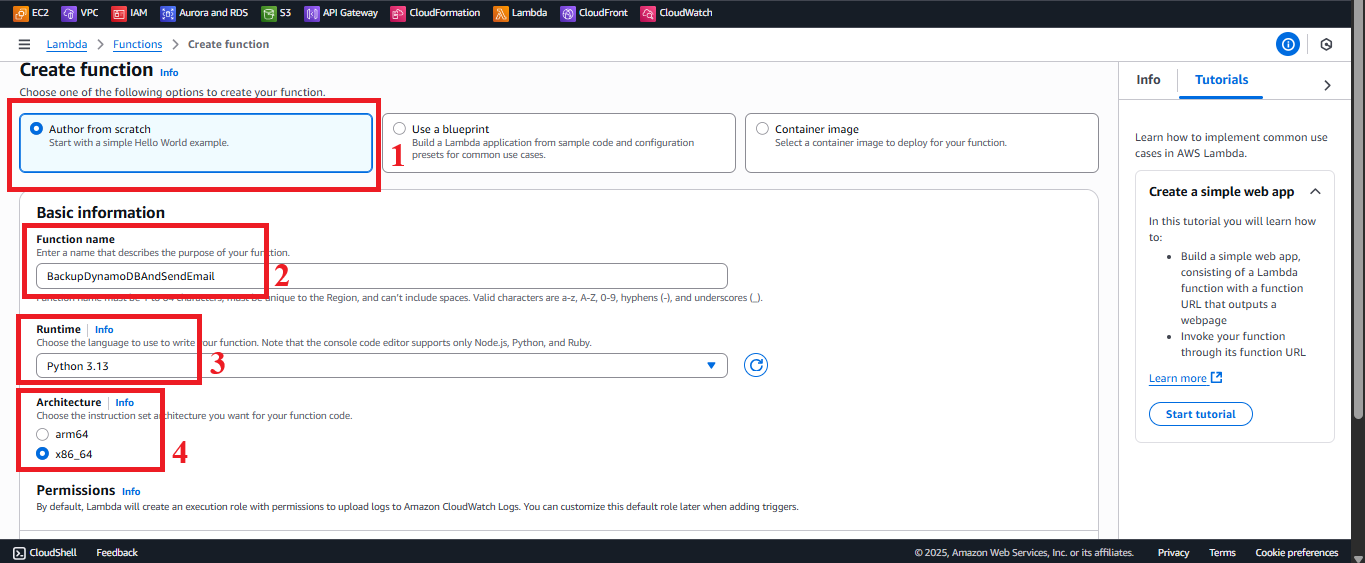
Figure 4: Basic function configuration interface. -
In the Permissions section, select Use an existing role.
- From the list of roles, choose
DynamoDBBackupRole(created in section 2.3). This role includes the policiesAWSLambdaBasicExecutionRole,AmazonDynamoDBReadOnlyAccess,AmazonS3FullAccess,AmazonSESFullAccess, andCloudFrontFullAccess. - Note:
CloudFrontFullAccessis not used in the current code but is retained as per previous instructions.
- From the list of roles, choose
-
Keep the other settings as default and click Create function to create the function.
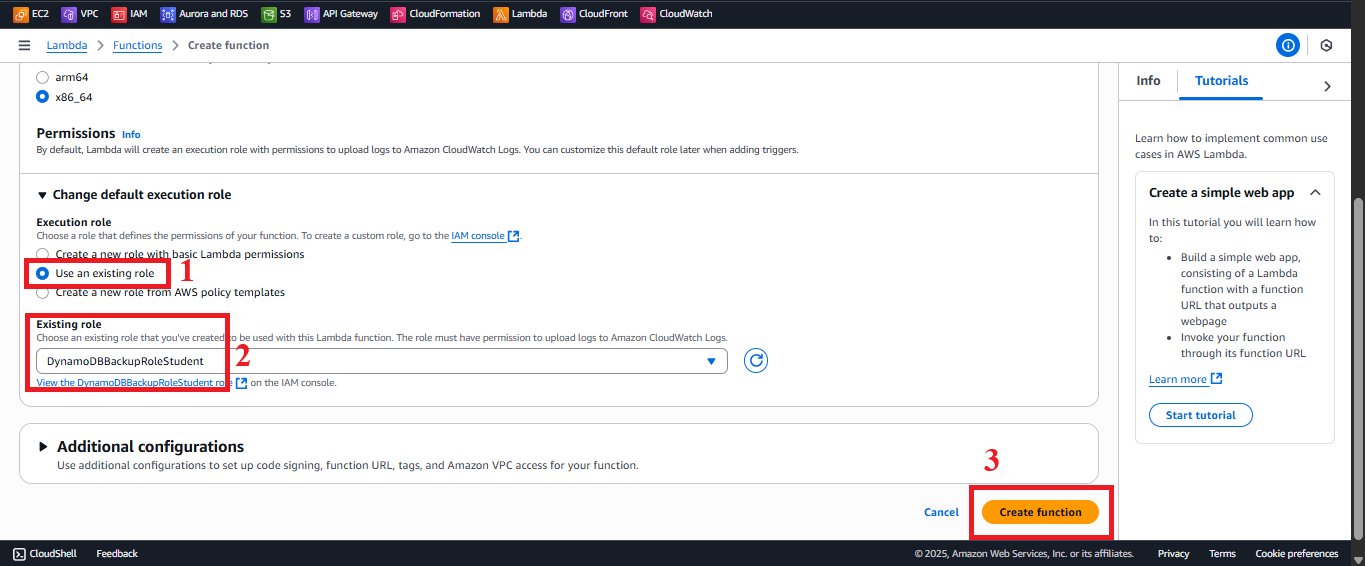
Figure 5: Select DynamoDBBackupRole and click Create function.
-
-
Check Function Creation Status
- After clicking Create function, you will be directed to the detail page for the
BackupDynamoDBAndSendEmailfunction. - The interface will show a message like: “Successfully created the function BackupDynamoDBAndSendEmail. You can now change its code and configuration. To invoke your function with a test event, choose Test.”
- If you don’t see the message or encounter an error, verify that the
DynamoDBBackupRoleexists and that your AWS account has thelambda:CreateFunctionpermission.
- After clicking Create function, you will be directed to the detail page for the
-
Configure the Code
- In the function details page for
BackupDynamoDBAndSendEmail, go to the Code tab and scroll down to the Code source section. - Delete the default code in
lambda_function.pyand paste the following code:
- In the function details page for
import boto3
import datetime
import json
from botocore.exceptions import ClientError

dynamodb = boto3.resource('dynamodb')
ses = boto3.client('ses')
s3_client = boto3.client('s3')

def lambda_handler(event, context):
    # Access DynamoDB table
    table = dynamodb.Table('studentData')
    response = table.scan()
    items = response['Items']

    # Store data in a temporary file in Lambda
    backup_file = '/tmp/backup.json'
    with open(backup_file, 'w') as f:
        json.dump(items, f)

    # Upload the file to S3
    s3_bucket = 'student-backup-20250706'  # Replace with your actual bucket name
    s3_key = f'backups/backup-{datetime.datetime.now().strftime("%Y%m%d-%H%M%S")}.json'
    s3_client.upload_file(backup_file, s3_bucket, s3_key)

    # Create pre-signed URL (expires in 1 hour)
    presigned_url = s3_client.generate_presigned_url(
        'get_object',
        Params={'Bucket': s3_bucket, 'Key': s3_key},
        ExpiresIn=3600
    )

    # Create an HTML email
    sender = 'baothangvip@gmail.com'
    recipient = 'nguyentribaothang@gmail.com'
    subject = 'Student Data Backup Notification'
    expiry_time = (datetime.datetime.now() + datetime.timedelta(hours=1)).strftime('%Y-%m-%d %H:%M:%S')

    html_body = f"""
    <!DOCTYPE html>
    <html lang="vi">
    <head>
        <meta charset="UTF-8">
        <style>
            body {{ font-family: Arial, sans-serif; color: #333; line-height: 1.6; }}
            .container {{ max-width: 600px; margin: 0 auto; padding: 20px; background-color: #f9f9f9; border-radius: 8px; }}
            .header {{ background-color: #4CAF50; color: white; padding: 10px; text-align: center; border-radius: 8px 8px 0 0; }}
            .content {{ padding: 20px; background-color: white; border-radius: 0 0 8px 8px; }}
            .button {{ display: inline-block; padding: 10px 20px; background-color: #4CAF50; color: white !important; text-decoration: none; border-radius: 5px; margin-top: 20px; }}
            .footer {{ font-size: 12px; color: #777; text-align: center; margin-top: 20px; }}
        </style>
    </head>
    <body>
        <div class="container">
            <div class="header">
                <h2>Student Data Backup</h2>
            </div>
            <div class="content">
                <p>Dear Customer,</p>
                <p>The student data has been successfully backed up and stored on AWS S3.</p>
                <p><strong>Download the backup file here:</strong></p>
                <a href="{presigned_url}" class="button">Download Backup File</a>
                <p><strong>Note:</strong> This link will expire on {expiry_time}.</p>
            </div>
            <div class="footer">
                <p>This is an automated email. Please do not reply to this email directly.</p>
            </div>
        </div>
    </body>
    </html>
    """

    try:
        response = ses.send_email(
            Source=sender,
            Destination={'ToAddresses': [recipient]},
            Message={
                'Subject': {'Data': subject},
                'Body': {
                    'Html': {'Data': html_body},
                    'Text': {'Data': f'Backup file: {presigned_url}\nExpires at: {expiry_time}'}
                }
            }
        )
        print(f"Email sent! Message ID: {response['MessageId']}")
    except ClientError as e:
        print(f"Error sending email: {e}")
        return {
            'statusCode': 500,
            'body': json.dumps({'message': f'Backup successful but email failed: {str(e)}'})
        }

    return {
        'statusCode': 200,
        'body': json.dumps({'message': 'Backup and email sent successfully!'})
    }
-
Explanation of the Improved Code:
- Logging: Added
loggingto record detailed logs to CloudWatch (INFO and ERROR levels), replacingprintfor easier monitoring. - Pagination Handling: Added a
whileloop to handle pagination for theScanoperation, ensuring that all data from large tables is fetched. - CORS: Added
Access-Control-Allow-Origin: '*'header in all responses to integrate with API Gateway. - Error Handling: Added
try-exceptblocks for theScan, file saving, S3 upload, and pre-signed URL creation steps, returning detailed error messages with a 500 status code. - AWS Region: Specified
region_name='us-east-1'for DynamoDB, S3, and SES to ensure consistency. - HTML Email: Kept the beautiful HTML content with inline CSS, but added
loggingfor email sending status.
- Logging: Added
-
Check and Modify:
- AWS Region: Replace
region_name='us-east-1'in thedynamodb,ses, ands3_clientinitialization lines if you are using another region (e.g.,us-west-2). - Email: Replace
baothangvip@gmail.com(sender) andnguyentribaothang@gmail.com(recipient) with verified SES emails (step 2.5). If SES is in sandbox mode, both emails need to be verified. - S3 Bucket: Replace
student-backup-20250706with your actual bucket name (to be created in the next step).
- AWS Region: Replace
-
Click Deploy to save and deploy the code.
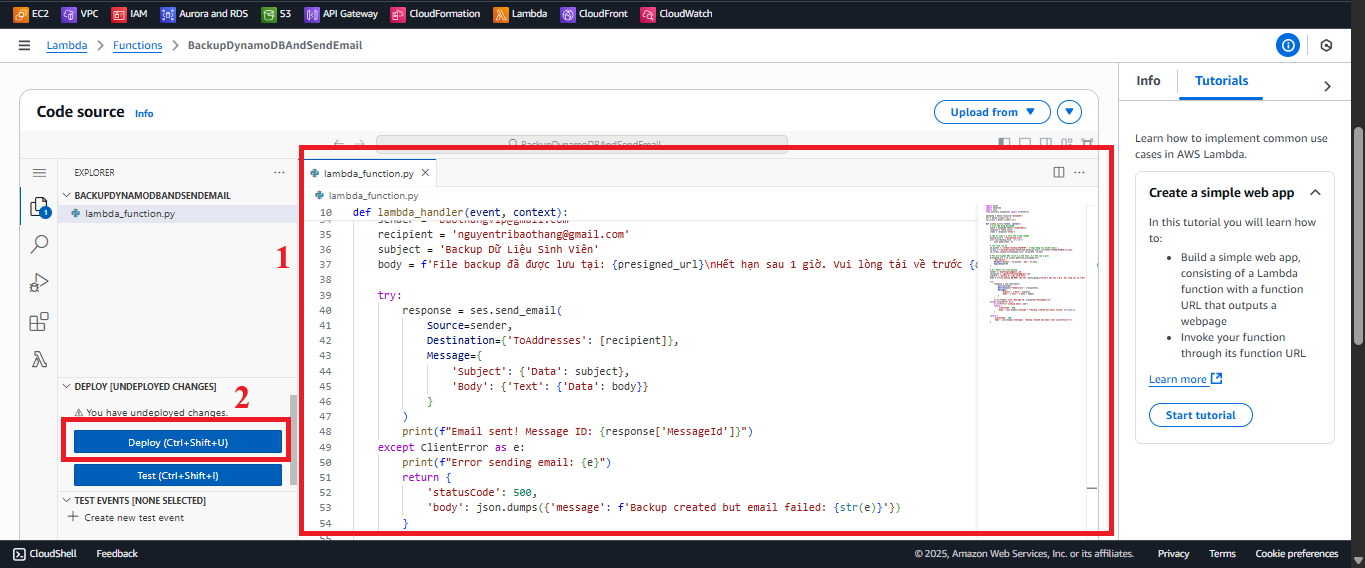
Figure 6: BackupDynamoDBAndSendEmail code editing interface. -
After deployment, the interface will display the message: “Successfully updated the function BackupDynamoDBAndSendEmail.”
-
Configure Timeout and Memory
- In the Configuration tab > General configuration, click Edit.
- Set Timeout: 60 seconds (enough for
Scan, file saving, S3 upload, and email sending). - Set Memory: 256 MB (to handle large tables and store temporarily in
/tmp). - Click Save to save the changes.
- Reason: The
Scanoperation on large tables and storing files in/tmpmay require more resources thangetStudentDataorinsertStudentData.
-
Test the Function
- In the Test tab, click Create new test event.
- Name the event (e.g.,
testBackupDynamoDB). - Use the sample JSON (it can be left empty as the function does not require specific input):
{} - Click Create to save the test event, then click Test to run the function.
- Check the result:
- If successful, the function returns:
{ "statusCode": 200, "body": "{\"message\": \"Backup and email sent successfully!\"}", "headers": { "Content-Type": "application/json", "Access-Control-Allow-Origin": "*" } } - Check the
student-backup-20250706bucket in the S3 Console (go to S3 > Buckets > student-backup-20250706 > Objects) to verify the backup file (e.g.,backups/backup-20250707-0409.json). - Check the recipient’s email inbox (
nguyentribaothang@gmail.com, including Spam/Junk) to view the notification email with HTML content like:<!DOCTYPE html> <html lang="vi"> <head> <meta charset="UTF-8"> <style> body { font-family: Arial, sans-serif; color: #333; line-height: 1.6; } .container { max-width: 600px; margin: 0 auto; padding: 20px; background-color: #f9f9f9; border-radius: 8px; } .header { background-color: #4CAF50; color: white; padding: 10px; text-align: center; border-radius: 8px 8px 0 0; } .content { padding: 20px; background-color: white; border-radius: 0 0 8px 8px; } .button { display: inline-block; padding: 10px 20px; background-color: #4CAF50; color: white !important; text-decoration: none; border-radius: 5px; margin-top: 20px; } .footer { font-size: 12px; color: #777; text-align: center; margin-top: 20px; } </style> </head> <body> <div class="container"> <div class="header"> <h2>Student Data Backup</h2> </div> <div class="content"> <p>Dear Customer,</p> <p>The student data has been successfully backed up and stored on AWS S3.</p> <p><strong>Download the backup file here:</strong></p> <a href="[pre-signed-url]" class="button">Download Backup File</a> <p><strong>Note:</strong> This link will expire on [expiry_time].</p> </div> <div class="footer"> <p>This is an automated email. Please do not reply to this email directly.</p> </div> </div> </body> </html> - Click the link in the email to verify that the backup file can be downloaded.
- Check the log in CloudWatch (go to Monitor > Logs > select log group
/aws/lambda/BackupDynamoDBAndSendEmail) to view detailed information (number of records, Message ID of the email). - If there are errors, check the common issues:
- “AccessDenied” (DynamoDB): Check that the
DynamoDBBackupRolehas theScanpermission. - “AccessDenied” (S3): Check the
PutObjectpermission inAmazonS3FullAccessand ensure thestudent-backup-20250706bucket exists. - “Email address is not verified” (SES): Ensure
baothangvip@gmail.comandnguyentribaothang@gmail.comare verified in SES. - “NoSuchBucket”: Ensure the
student-backup-20250706bucket has been created (to be set up in the next step). - “ResourceNotFoundException”: Ensure the
studentDatatable exists (step 2.4).
- “AccessDenied” (DynamoDB): Check that the
- If successful, the function returns:
Important Notes
| Factor | Details |
|---|---|
| IAM Role | The DynamoDBBackupRole (created in step 2.3) is suitable for the function. However, CloudFrontFullAccess is not used. For least privilege, consider removing or replacing it with a custom policy if needed. - Go to IAM > Policies > Create Policy. - Choose JSON, paste the policy above (replace student-backup-20250706 with the actual bucket name). - Name it (e.g., S3BackupStudentData) and attach it to DynamoDBBackupRole. |
| SES Sandbox | Ensure both sender (baothangvip@gmail.com) and recipient (nguyentribaothang@gmail.com) emails are verified in SES (step 2.5). If SES is in sandbox mode, both emails must be verified. Exit the sandbox to send emails to any address: - Go to SES > Account dashboard > Request production access. - Fill in the form as instructed in step 2.5. If not out of sandbox, try using the same verified email for both sender and recipient. |
| S3 Bucket | Ensure the student-backup-20250706 bucket is created (to be configured in the next step). If not, the function will throw a NoSuchBucket error. Ensure the bucket has a backups/ folder, or the code will create it (if PutObject permission is granted). |
| CORS | The Access-Control-Allow-Origin: '*' header is added to support integration with API Gateway (if the function is called from a web interface). Ensure CORS is configured in API Gateway (to be discussed in later steps). |
| AWS Region | Ensure the region in the code (us-east-1) matches the region of the studentData table, the S3 bucket, and SES. If using another region (e.g., us-west-2), update region_name in the dynamodb, ses, and s3_client initialization lines. |
| Error Handling | If the function reports errors, check the logs in CloudWatch (go to Monitor > Logs > select the log group /aws/lambda/BackupDynamoDBAndSendEmail). Common errors: - “AccessDenied” (DynamoDB): Missing Scan permission. - “AccessDenied” (S3): Missing PutObject permission or the bucket does not exist. - “Email address is not verified” (SES): Email not verified. - “ResourceNotFoundException”: studentData table not created. Use CloudTrail or IAM Access Advisor to pinpoint permission issues. |
| Optimization | - Added pagination handling for Scan (as improved in the code). - Used logging instead of print (as added). - Increased memory (256 MB) and timeout (60 seconds) for handling large tables. - For enhanced security, verify the SES domain (see AWS SES Documentation - DKIM) and update the sender email (e.g., no-reply@system.edu.vn). - If the studentData table is large, consider using DynamoDB Streams for incremental backups rather than using the Scan operation on the whole table. |
| Early Testing | After creating and deploying the function, run tests to verify the backup file in S3, the notification email, and the logs in CloudWatch before integrating with CloudWatch Events/EventBridge (for scheduled backups). |
Practical Tip: Add sample data to the
studentDatatable, check the S3 bucket and recipient’s email (including Spam/Junk) to verify results.
Conclusion
The Lambda function BackupDynamoDBAndSendEmail has been created to back up student data from the studentData table to S3 and send a notification email with a file download link. The function is ready for integration with CloudWatch Events/EventBridge for scheduled backups.
Next Step: Proceed to Configuring CloudWatch Events/EventBridge to continue!